「6」git 初阶:安装配置 ~1
自盘古开天辟地~~~~
扯远了…
完整的分享下Git的使用和学习的知识点,之前章节中的Git常用技巧是我之前部分快速使用的场景,适合于有经验的开发者,现在来系统的分享下对于Git的理解,也算是自己学习的记录。
¶前景
SVN估计是家喻户晓了,一直被用作'版本管理'和代码仓库。(ps:不算是完整的版本管理.)
Git的出现,是linus之父休假时产出的“作品”,版本管理 & 代码仓库的作用。总而言之,用熟练Git了,就再也回不去了。
¶目标:
最终可以顺利的提交代码即可。
¶此篇只分享两个知识点:
安装Git和Git基本配置
¶Git安装
说安装其实就是去官网下载软件,安装到你选定地方即可。
在此附上官网的下载链接: 点击进入
选择对应平台windows?linux?macos?
ps:别选错了,那就very尴尬了。
¶基本配置
说到基本配置,大多数都会有,更何况是如此强大的版本控制软件。
¶前期基本配置
主要分三个地方:
1 | 1、/etc/gitconfig 文件: 系统上每一个用户及其他们的仓库配置文件。 |
ps: 优先机制:3 > 2 > 1 [.git/config覆盖~/.gitconfig、 ~/.gitconfig覆盖/etc/gitconfig]
¶注意:
1 | windows下的~/.gitconfig路径为:C:\Users\$USER下;$USER指当前电脑用户名称 |
¶查看所有配置命令
1 | git config --list --show-origin |
¶生成密钥&关联Github/Gitlab
¶生成密钥
根据邮箱,会要求输入密码,连续3个回车即可。
1 | ssh-keygen -t rsa -C "这里换上你的邮箱" |
最后得到id_rsa和id_rsa.pub两个文件。
这里用到的是你的 公钥id_rsa.pub文件,复制文件里面的内容到github密钥的界面:

添加SSH完了之后,就绑定了你本机器和github的关联关系,相当于授权成功。
¶拓展
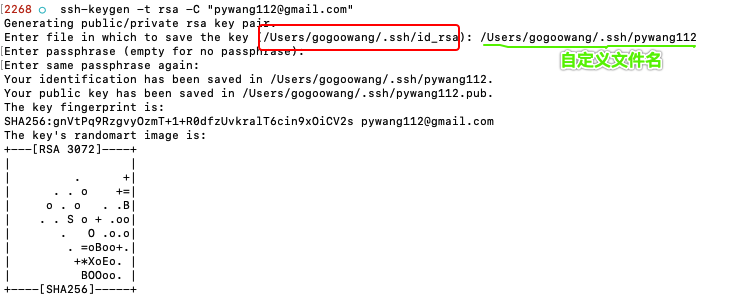
上述生成密钥时也可以自定义文件名称.此种情况针对你有多个github账号时,提交公钥文件时,找出自定义名称的文件即可。(下图自定义生成文件名称pywang112,则公钥为pywang112.pub,看好你生成的路径哦)

¶global配置(全局配置)或 local配置(当前仓库配置)
¶global配置(针对你只有一个git账户的情况)
1 | 查看命令: |
¶local配置 (建议本地仓库配置,这样比较灵活)
1 | 查看命令: |
¶配置完成,clone/commit代码
¶clone仓库代码

1 | git clone https://github.com/crab21/blog.git |
¶commit代码
按照如上配置完成后,就可以完成基本的push和pull仓库代码了。